Service explanation for JA-151M Wireless mini magnetic contact This product is a component of the JABLOTRON JA-100 alarm system. It serves to detect the opening of a door, window etc. The detector is powered from a miniature battery and features an optional response (pulse or status response). The product should...
JA-151M
Too much choice? Chat or call us at 085-0160316
There are no products in these categories. Shop on.

Service explanation for JA-151M
Wireless mini magnetic contact
This product is a component of the JABLOTRON JA-100 alarm system. It serves to detect the opening of a door, window etc. The detector is powered from a miniature battery and features an optional response (pulse or status response). The product should be installed by a trained technician with a valid Jablotron certificate.
Installation
Select a suitable location for installation. The detector responds to distance extension of the permanent magnet. The magnet can be either left or right. Mount the transmitting part on the fixed part of door (window) and the magnet on the moving part. Avoid placement directly on metal objects (they negatively affect the operation of the magnetic sensor and also radio communication).

Figure: 1 - drop-in clamp of the screen; 2 - red signal light of activation
1. Open the screen of the detector by pressing the drop-in clamp (1).
2. Screw the plastic back panel to the fixed part of door (window).
3. Screw the permanent magnet to the moving part of door (window). The distance between the magnet and the transmitting part should be as short as possible. The distances of the magnet activating the detector are shown in the figure.
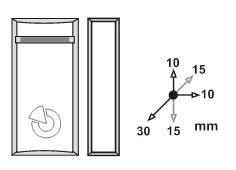
Figure: distances for detector activation
4. Teach the detector into the central unit (receiver). The prerequisite for reading into the system is the presence of a JA-110R radio module in the system. Select the desired position in the F-Link programme on the peripheral devices map, and by selecting Read in, switch on the learning mode. The learning signal is sent into the detector at the moment the battery is inserted.
5. After learning, set the detector on the rear panel.
6. Set the function of the detector using the F-Link programme.
7. Test the function of the detector.
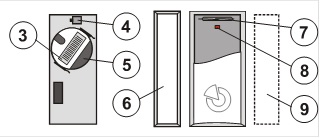
Figure: 3 - serial number; 4 - tamper switch; 5 - battery; 6 - permanent magnet; 7 - magnetic transducer; 8 - red signal light of detector activation; 9 - alternative placement of permanent magnet
Notes:
If you learn the detector in the receiver after the battery was already connected, as first disconnect it, then press and release the screen contact (4) (the residual energy is used up) and only then perform the learning mode.
The detector can be read into the system by entering the serial number (3) using the F-Link programme or from the keypad (or barcode reader). All digits below the barcode are entered (1400-00-0000-0001).
Setting the detector's properties
The detector has 2 modes indicated by one or two flashes of the signal light when the battery is inserted.
- One flash means that the detector will report opening and closing, monitor and report own status (status response).
- Two flashes mean a pulse response, i.e. the detector will report activation only (opening of the door or window).
The working mode is determined when the battery is inserted, by pressing and holding the contact switch of the detector's screen, inserting the battery and releasing the switch 3-5 seconds after inserting the battery. The detector then flashes once or twice, depending on the mode just selected. The factory setting is the status response.
Other setting of the functions is done using the F-Link programme, in the Peripheral Devices card. Here, the type of reaction with which the system will respond to activation of the learned detector can be set, the section into which it will be read, and possibly also the PG output, which can be controlled by the detector. From the factory, the response Delayed A is set (it grants a walk-in and walk-out delay).
Detector testing
During 15 minutes after the detector screen is closed, test mode is enabled, with each activation transmitted and indicated by the signal light on the detector screen. The detector's signal and activations can be monitored in service mode of the control unit via the F-Link programme in the Diagnostics window.
Replace battery in detector
The system automatically reports as soon as the battery runs out. Before replacing the battery in the detector, the system must be switched to Service mode (otherwise a tamper alarm will be called).
Technical parameters
Power supply lithium battery, type CR2032 (3.0V, 220 mAh)
Typical battery life approx 2 years (max. 20 activations/day)
Communication band 868.1 MHz, protocol JABLOTRON
Communication range approx. 200m (direct visibility)
Detector dimensions 55 x 26 x 16 mm
Magnet dimensions 55 x 16 x 16 mm
Classification grade 2
compliant with CSN EN 50131-1, CSN EN 50131-3
Environment in accordance with CSN EN 50131-1 II. indoors, general
Range of operating temperatures -10 to +40 °C
Further complies with CSN EN 50130-4, CSN EN 55022
The JA-151M product is designed and manufactured in accordance with the provisions to be applied to it: Government Decree No. 616/2006 Sb., if used according to its intended use.
Note: Although this product does not contain any harmful materials, do not dispose of it in the domestic waste, but dispose of it at the collection point designated for electronic waste.
Installation
Select a suitable location for installation. The detector responds to distance extension of the permanent magnet. The magnet can be either left or right. Mount the transmitting part on the fixed part of door (window) and the magnet on the moving part. Avoid placement directly on metal objects (they negatively affect the operation of the magnetic sensor and also radio communication).
Figure: 1 - drop-in clamp of the screen; 2 - red signal light of activation
1. Open the screen of the detector by pressing the drop-in clamp (1).
2. Screw the plastic back panel to the fixed part of door (window).
3. Screw the permanent magnet to the moving part of door (window). The distance between the magnet and the transmitting part should be as short as possible. The distances of the magnet activating the detector are shown in the figure.
Figure: distances for detector activation
4. Teach the detector into the central unit (receiver). The prerequisite for reading into the system is the presence of a JA-110R radio module in the system. Select the desired position in the F-Link programme on the peripheral devices map, and by selecting Read in, switch on the learning mode. The learning signal is sent into the detector at the moment the battery is inserted.
5. After learning, set the detector on the rear panel.
6. Set the function of the detector using the F-Link programme.
7. Test the function of the detector.
Figure: 3 - serial number; 4 - tamper switch; 5 - battery; 6 - permanent magnet; 7 - magnetic transducer; 8 - red signal light of detector activation; 9 - alternative placement of permanent magnet
Notes:
If you learn the detector in the receiver after the battery was already connected, as first disconnect it, then press and release the screen contact (4) (the residual energy is used up) and only then perform the learning mode.
The detector can be read into the system by entering the serial number (3) using the F-Link programme or from the keypad (or barcode reader). All digits below the barcode are entered (1400-00-0000-0001).
Setting the detector's properties
The detector has 2 modes indicated by one or two flashes of the signal light when the battery is inserted.
- One flash means that the detector will report opening and closing, monitor and report own status (status response).
- Two flashes mean a pulse response, i.e. the detector will report activation only (opening of the door or window).
The working mode is determined when the battery is inserted, by pressing and holding the contact switch of the detector's screen, inserting the battery and releasing the switch 3-5 seconds after inserting the battery. The detector then flashes once or twice, depending on the mode just selected. The factory setting is the status response.
Other setting of the functions is done using the F-Link programme, in the Peripheral Devices card. Here, the type of reaction with which the system will respond to activation of the learned detector can be set, the section into which it will be read, and possibly also the PG output, which can be controlled by the detector. From the factory, the response Delayed A is set (it grants a walk-in and walk-out delay).
Detector testing
During 15 minutes after the detector screen is closed, test mode is enabled, with each activation transmitted and indicated by the signal light on the detector screen. The detector's signal and activations can be monitored in service mode of the control unit via the F-Link programme in the Diagnostics window.
Replace battery in detector
The system automatically reports as soon as the battery runs out. Before replacing the battery in the detector, the system must be switched to Service mode (otherwise a tamper alarm will be called).
Technical parameters
Power supply lithium battery, type CR2032 (3.0V, 220 mAh)
Typical battery life approx 2 years (max. 20 activations/day)
Communication band 868.1 MHz, protocol JABLOTRON
Communication range approx. 200m (direct visibility)
Detector dimensions 55 x 26 x 16 mm
Magnet dimensions 55 x 16 x 16 mm
Classification grade 2
compliant with CSN EN 50131-1, CSN EN 50131-3
Environment in accordance with CSN EN 50131-1 II. indoors, general
Range of operating temperatures -10 to +40 °C
Further complies with CSN EN 50130-4, CSN EN 55022
The JA-151M product is designed and manufactured in accordance with the provisions to be applied to it: Government Decree No. 616/2006 Sb., if used according to its intended use.
Note: Although this product does not contain any harmful materials, do not dispose of it in the domestic waste, but dispose of it at the collection point designated for electronic waste.